Chocolate Chunk Cookie Recipe

My favourite Chocolate Chunk Cookie recipe!

Experienced baker and don’t want my explanations?
Photo of the cookie recipe card is at the bottom. of this page.

I love to bake, and sharing food is one of the many ways I nourish my relationships. These cookies are a labour of love… and SO worth the extra bits of effort. 

I find freshly baked cookies so comforting, and these chocolate chunk ones have been a favourite with the people I’ve shared them with. I’ll often keep a batch of these dough balls in my freezer so I can quickly bake something *amazing* (with very little effort) if someone stops by with little-to-no notice. 

 It’s a recipe my friend shared with me (I think from the Tasty food blog?) years ago that I wrote down once and have made several tweaks to over time. Always a facilitator at heart, I also have notes, explanations, and options added in.

I shared this in a community a few months back, and one person said:

“I had not fully understood the difference all these steps make previously, I have watched other professional recipes and actually this is the one where it clicked !!”.


Hopefully my notes are helpful for you too!
As always, feel welcome to send me a message using the pink-heart chat widget below.

This is not vegan or gluten-free, and wish I had guidance on how to adapt this recipe well. If you *are* familiar with how to modify recipes to account for allergies and food sensitivities, I’d love to add your input to make this recipe more inclusive. 🫶🏽

Prelude over... Here we go!

Chocolate chunk cookie

ingredients:

It helps me to mentally separate the ingredients based on the steps in the process. I tend to put them in clusters on different parts of my counter, or line them up in order of use.

PART ONE
1 cup unsalted butter

PART TWO
1 cup bread flour (for extra gluten-y chewiness!)
3/4 cup all purpose flour
1.5 tsp salt (I use freshly ground pink Himalayan)
1 tsp baking soda (make sure it’s reasonably fresh. I keep mine in a mason jar.)

PART THREE
1 cup dark brown sugar (golden brown is fine, but dark is better)
1/2 cup granulated white sugar
2 tsp vanilla extract
1 tsp hojicha powder (or espresso, if you’re more into coffee than tea)

PART FOUR
1 large egg + 1 egg yolk (I use the leftover egg white in a scramble, or fancy mocktail)

PART FIVE
1/2 cup semi sweet chocolate chips (mini chips distribute better and taste extra chocolatey!)
5 oz of dark chocolate (about 150g. I’d use a bar or ‘chunks’, so it’s a different texture and shape from the chips.)

If I’ve already lost you because the ingredients are too fussy for you, I totally understand.


If you’re still with me,
here’s what I do with the ingredients:

Chocolate chunk cookie

COMBINING:

Aside from the butter it only takes me about 10 mins to mix it all together. The waiting is the hardest part!

PART ONE
Brown the butter (simmer over medium-ish heat until the milk solids get toasty – they’ll turn brown and bubble or foam to the top).  If you have less than 1 cup of brown butter when you’re done, add water to make up the difference. Let it cool to room temperature or a bit below – it should go back to a soft semi-solid before you use it. I let the mixer soften it up a bit first: this is what it looks like before I move on to Part Two.

I often brown the butter the night before I plan to bake (or before I head to the store to pick up missing ingredients) so that it’s ready when I am. It keeps for a while in the fridge. Don’t ask me how long! 😶‍🌫️ If I put it in the fridge, I take it out an hour or two before I use it so it isn’t *too* cold.

PART TWO
Sift the two flours, salt, and baking soda together to get rid of any clumps and make it airy. This mix waits in a bowl. It’s on standby for now.

PART THREE
Cream the cooled brown butter with both sugars, then add vanilla and hojicha/espresso powder. It should only take a minute or two if you have a stand mixer – mix well til its lighter in colour and a bit fluffier.

PART FOUR
Add the egg-and-a-half to your wet mix (PART THREE).

Once it’s a homogenous blend, then add your bowl of dry mix (on standby from PART TWO). Do it about one third at a time, making sure to scrape the sides and bottoms of your bowl so there aren’t any gross clumps later.

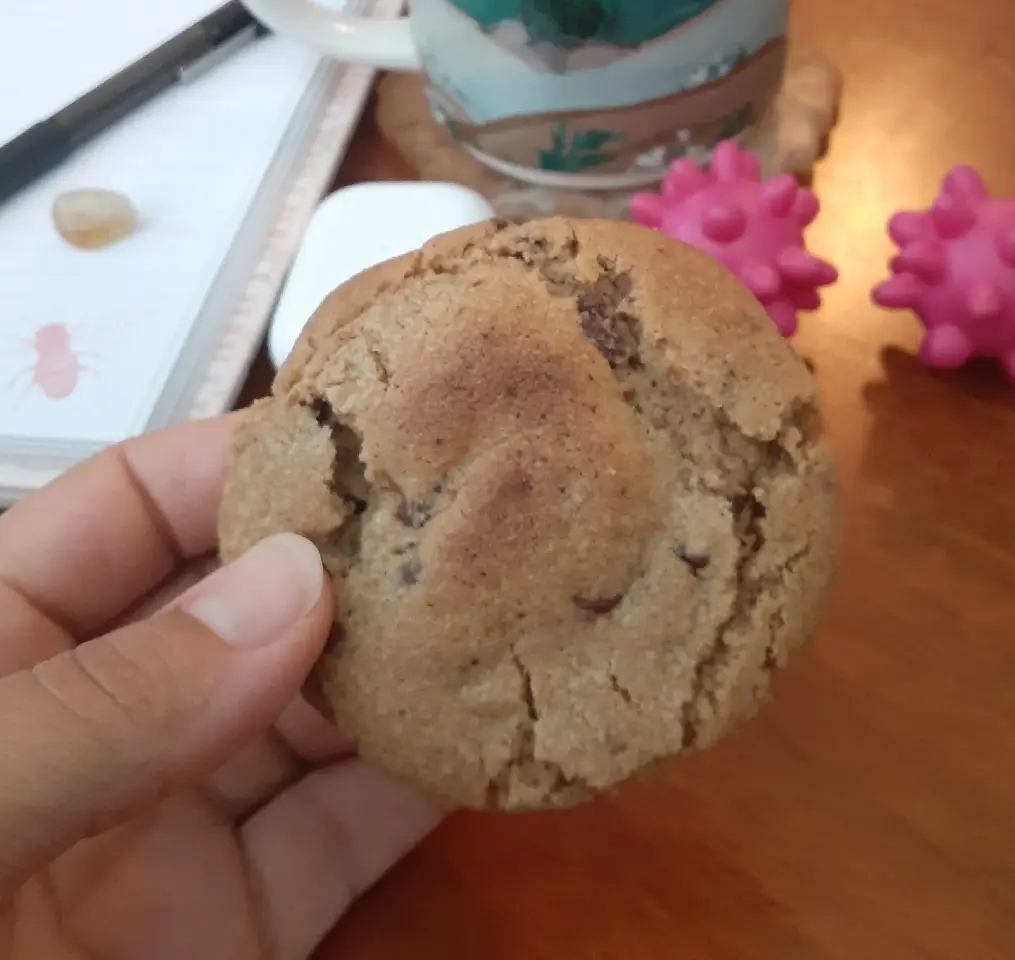
You could use this as the base dough for any kinds of mix ins you wanted. But I like chocolate chunk the best!

PART FIVE
Chop up the dark chocolate chunks/bar so most pieces are about 1-1.5 cm (if you’re from the US: maybe about 1/2″). I slice a chocolate bar on the diagonal (both ways) instead of chopping it parallel to where the pieces break off – I find it’s easier to cut this way, and I get more interesting shapes.

Fold in the chocolate chips and chopped dark chocolate pieces. We’ve tried to make the dough fluffy and airy, so only mix as much as you need to. It’s not super precious though, so don’t stress!

Chocolate chunk cookie

prep:

NEXT:

Scoop out your dough balls onto a baking sheet. I use parchment paper so the dough doesn’t freeze to the metal sheet. These cookies are indulgent and fancy, so I make ’em a bit bigger – about 2 tbsp usually, sometimes 3 tbsp if I want them the size of my palm.

I have a measuring scoop, but in a pinch will just use a regular-degular 1 tbsp measuring spoon and let it mound and overflow so there’s as much on the top as there is in the measuring part of the spoon. So it’s about doubly full (hope this makes sense).

Then I roll these mounds into balls and put them on the lined baking sheet as I go. They can touch lightly but shouldn’t be smushed together or they’ll freeze that way.

Put them in the fridge/freezer for AT LEAST an hour. I recommend two days. 

Seriously – it makes a difference. They’re still delicious if you bake them the same day, but the flavours get deeper and the flour gets more hydrated if you wait.


Chocolate chunk cookie

baking:

WHEN YOU’RE READY TO EAT THEM:

Take as many cookie balls as you want out (freeze the rest), and put them on a cookie sheet. Preheat the oven to 350F / 175C and let the cookies warm on the tray as the oven warms.

I like my cookies super soft and sliiightly underdone, so if they’re room temperature when I start baking, about 10 minutes in the oven is the perfect baking time for me. (You might need to adapt the baking temperature and time based on your oven, altitude, etc. ) If I make the balls 3 tbsp each or they’re more on the frozen side, they’ll take maybe 12-14 minutes. 

Oh, and sometimes, if I’m feeling extra fancy, I’ll make sure the cookie balls are fully at room temperature and BROIL the tops for 2-3 minutes first, before baking at 350 for the rest of the time.

(Because usually when you bake, only the bottom of the cookie is in contact with the pan, so the bottom usually cooks more than the top does. Broiling bakes the top a bit first.)

I swear this is the secret for the perfectly-cooked, crackly top, bakery-style cookies.

Pink Background w Sparkle

I could go on, but I should probably stop here 🤓

I’m not a professional recipe writer or food photographer so hopefully this was helpful and not too chaotic. 😅 I’ll see if I can convince a friend to take some good pics the next time I bake them. 

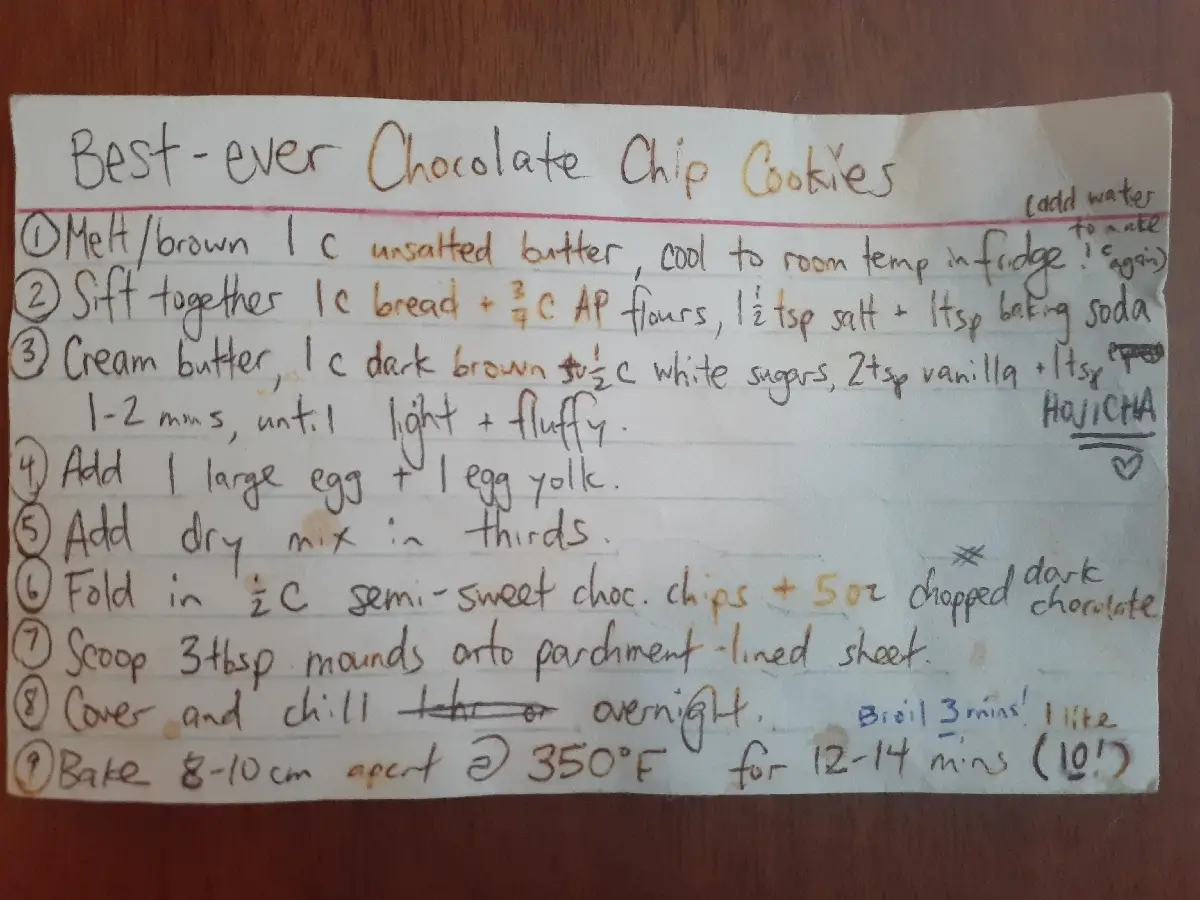
For now – please enjoy a picture of the well-worn recipe card. That’s how you KNOW it’s a keeper.

If you have any questions, suggestions, or points of clarification please let me know using the chat widget! 

send me a message!

Whatcha thinkin'?

Do you have any questions about anything? Did you try making these? Ideas on how to make ’em vegan? Let me knowwww!

If you want to send me a message with your thoughts… It’d make me very happy! There’s a floating chat bubble in the shape of a heart near the bottom of the page.
 
Your message will be sent directly to me and I’ll reply to you when I can. 💛 
✨✨✨